
Key Takeaways
You require precise cabinet handle measurements not only for that clean, professional aesthetic, but so your new hardware aligns with those old screw holes. Always measure whether you’re installing brand new cabinetry or swapping out old pulls and knobs.
Prepare your tools before you begin: ruler or tape measure, pencil, level, screwdriver, and note paper. It gets you organized and makes you work uniformly on all doors and drawers.
You’ll measure a few key dimensions for each handle: center-to-center, overall length, projection, and width, and log them in both MM and inches. Double-checking these numbers before you order hardware minimizes the chance of poor fit or misaligned holes.
From bar pulls and cup pulls to knobs and edge pulls, each handle style comes with a specific measurement focus and placement requirements. Whether it’s the style of your hardware or size that you need to match to your doors, drawers, and appliances helps to customize the function and overall design.
That is, you need to measure and mark doors and drawers separately in order to achieve a cohesive result. For doors, vertical placement and door swing are important, whereas with drawers, centered ergonomic placement is more important, especially with wide or deep drawers.
You pay for this attention to detail when working with vintage hardware, uneven surfaces and ergonomic requirements by recording any abnormal measurements and checking grip comfort. This detail-oriented approach prevents typical errors and ensures an easy, durable installation.
How to measure cabinet handles ultimately boils down to knowing a handful of important measurements and following an easy step-by-step approach that suits your type of hardware and cabinet style! You require distinct center-to-center spacings, total handle lengths and screw positions so fresh pulls align with previous holes and perch level on the door or drawer. For a crisp refresh, you need to coordinate handle size to cabinet width and height so that nothing appears either crowded or gigantic. With proper specs, you skip re-drilling, filler pieces and guesswork at the store or online. In the next steps, you’ll learn how to measure your current handles and select new ones with less angst and waste.
The Measurement Foundation
Precise cabinet hardware measurements protect you from sneering lines, additional holes, and hardware that squeaks every time you open a door. By measuring carefully, the cabinet pulls align throughout the room, doors shut crisply, and your cabinetry appears intentional instead of cobbled. This attention to detail is essential not only for brand-new cabinets but also when you swap out old pulls or knobs to achieve a fresh, modern finish without re-building every front.
Getting the right measurements saves you from disasters lurking beneath the surface. You can determine if new drawer pulls align with existing screw holes, if projection clears adjacent walls, and if the handle size is appropriate for each door or drawer. A pull that is approximately one-third the length of the drawer is a good guideline, while cabinet doors follow more design-based considerations. When you get these details right, you achieve both aesthetics and comfort: your hand has ample space, the edge distance feels natural, and the hardware aligns with modern cabinetry standards.
Essential Tools
You work better with the small set of tools primed. A trusty tape measure is central, supported by a stiff ruler or even a caliper if you desire extra precision readings on metal hardware. This is useful when you’re comparing a 160 mm center-to-center pull to a 128 mm one and need to be sure.
You’ll want a sharp pencil for marking hole centers and a level to keep handles in a straight line. This is key when you run a row of upper cabinets. A standard screwdriver, along with a barebones toolkit, allows you to take off old hardware and test fit a sample pull before you decide to drill new holes.
Keep a notepad or a notes app open and record every size: center-to-center, overall length, projection, and counts of each type. It gives you direction when you order and prevents mix-ups between, say, 160 mm and 6-1/4 in pulls.
Key Terminology
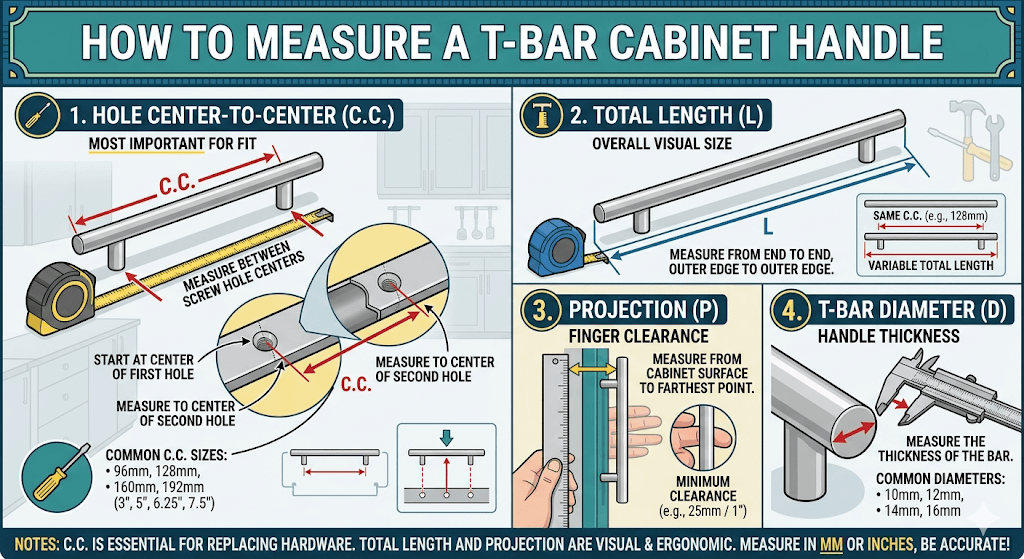
Center-to-center is the distance between the screw holes on a pull and it’s the primary number you match up when you swap handles without filling old holes. Overall length is the tip-to-tip size, projection is how far the handle projects off the door or drawer face, and width is how thick it is side-to-side from the front.
Cabinet hardware is a blanket term that encompasses pulls, knobs, and larger appliance pulls on tall fridge fronts or big pantry doors. Knobs are single-hole, so for them, 1-1/4 inches and positioned roughly 2.5 to 3 inches from the door edge is often a safe, typical selection, with many doors located about 2 inches down from the top corner opposite the hinges. Pulls utilize two screws, and for upper doors, pulls 5 to 7 inches work perfectly for most styles, and longer pulls are more contemporary.
Most specs are in millimeters and inches so it’s helpful to check both. For drawers, a pull about one-third of the drawer width always seems to feel in balance, while door hardware placement can vary more with design. A level is still your best friend when you butt several cabinets together so each pull or knob aligns in a nice, neat band.
How to Measure Cabinet Handles
Getting precise handle measurements is the first step to avoid misplaced holes, costly returns, and awkward-lipped grips. Use a good tape measure and record all your measurements in millimeters and inches, especially for cabinet hardware, before you buy anything.
Determine whether you’re using old holes or making new ones.
Measure center‑to‑center distance for pulls and knob locations.
Record overall length, projection, and width of each handle.
Mark intended locations with a light pencil line and verify with a level.
Verify all measurements, then compare to specifications before ordering.
1. Identify Your Need
Begin by determining whether you are putting cabinet hardware in old holes, switching things up with a new style but the same hole locations, or hanging hardware on all new cabinets. If the holes remain, every measurement has to align with them or your new cabinet pulls won’t fit. The first step is to ensure that the hole placement matches the pulls you choose.
Next, select if you require knobs, bar pulls, cup pulls, or specialty hardware such as finger pulls or edge pulls. Cabinet pulls are popular on doors, but pulls tend to work better on wide drawers. A pull roughly a third the drawer length is a good rule of thumb. For standard cabinetry doors 12 inches to 36 inches wide, a 1¼ inch knob is the most common size and fits many configurations.
Consider finish and style in the context of the room as a whole, not by itself. A slim black bar pull can complement simple, flat-front doors, while a larger, curved metal pull might fit more detailed fronts or tall pantry doors. Choosing the right size and style adds to the overall aesthetic of your space.
If someone in your home suffers from arthritis or limited grip strength, be sure to consider handles with soft edges, deeper projection, and ample finger clearance. Bigger pulls with soft curves can be just as easy to grab as a small round knob.
2. Measure Center-to-Center
Center-to-center (C-C) is the distance between the screw holes on a pull. For current cabinets, place the tape measure or a ruler on the back of the door or drawer and measure from the center of one screw hole to the center of the other. A caliper is useful if you want very fine precision, but a good metal tape measure usually suffices.
Record this C-C distance in millimetres and inches, as many suppliers have one or the other. For instance, 96 mm is approximately 3¾ inches and 128 mm is around 5⅟₁₆ inches. If you’re working on a full kitchen, make a little table with cabinet name or number and its C-C size so you can order matching pulls all at once.
When planning new placement, think about standard rules: place knobs about 2½ inches to 3 inches from the door corner, opposite the hinge, and about 2 inches down from the top edge on doors without a drawer above. To locate the precise corner spot, first measure half the door width and half the height so you know where the actual center is, then figure out from there.
3. Record Overall Length
The overall length of cabinet pulls is the total end-to-end measurement, which includes decorative ends or flared points. To measure correctly, lay the handle on a flat surface, hook the tape on one end, and read the size at the other end. Record this number as the C-C size, as two pulls with the same C-C can look very different on the cabinet door. This measurement is essential for choosing the right cabinet hardware for your cabinetry.
Use the length to determine how the cabinet pull will look when mounted on doors and drawers. For instance, on a 60 cm wide drawer, a 20 cm pull (roughly one-third the width) will generally appear balanced. Conversely, a petite pull might seem out of place, while a very long pull could dominate the space. It’s crucial to consider the depth and size of your cabinet pulls to achieve a cohesive look.
Finally, compare your notes with common sizes available from vendors. This will help you maintain consistency across your cabinetry. A single length can work for most cabinet doors, while a longer version of the same design may be suitable for tall pantry doors or wide drawers, ensuring that you achieve that desired ‘family’ look throughout your home.
4. Note The Projection
Projection refers to how far the cabinet pulls extend from the face of the cabinetry. To measure accurately, hold one end of the tape against the cabinet door and extend it straight out to the furthest point of the handle. This measurement is crucial for both comfort and navigation in your space. It’s important to ensure that the projection allows enough room for your fingers to wrap behind the pull without scraping the door, especially on thicker doors or appliances with panel fronts.
A pull that is too shallow can pose difficulties for users, particularly those with joint pain. Additionally, verify that the projection does not cause handles from two cabinet doors to collide or hit nearby walls, tall appliances, or trim when opened. Document this measurement along with each cabinet hardware style to maintain a consistent aesthetic throughout your home.
When choosing cabinet hardware, keep in mind the right size and projection for your needs. This will ensure that your cabinetry not only looks stunning but also functions effectively in your space.
5. Document The Width
Width is the measurement across the pull at its widest point, front view. Measure straight across the face, not along the curve. This gives you a better sense of how visually heavy the handle will be on the cabinet front.
Correspond the width to the size of the door or drawer. A very wide, chunky pull on a narrow, 30 cm drawer can crowd the panel, whereas a slim bar pull might function much better. On wide drawers, a wider pull can appear more in scale and is simpler to grab.
Use this width number to compare minimalist bar pulls with thicker, detailed designs. Want a light, clean look? Stick to slimmer widths with similar projection across all fronts.
When you plan placement, use a level and a light pencil mark for each position, so handles line up across multiple cabinets. For instance, on multiple doors in a row, make a mark 2 inches down from the top edge and 2.5 to 3 inches in from the side, then lightly draw a line with the level. Verify everything again before you drill, and save all of your measurements and notes for replacements down the road.
Handle Styles and Measurements
Handle style influences what and how you measure. It influences the way your kitchen feels to use on a daily basis. Most pulls are standard center-to-center sizes such as 76mm, 96mm, and 128mm, usually on handles between 3 and 5 inches long. These sizes work nicely on doors or drawers up to around 600 mm wide.
Popular cabinet handle styles include:
Bar pulls
Cup pulls
Knobs
Edge pulls
Every style requires its own special measuring from center-to-center spacing to projection, grip space and even how it aligns with drawer or door edges. Style guides placement: on doors, many people place handles about 50 mm from the top edge, opposite the hinges, while on drawers a pull about one-third the drawer length keeps things balanced. For a tranquil, organized aesthetic, you can either duplicate the same style and size on all fronts or combine knobs and pulls in an obvious pattern, like knobs on upper doors and pulls on base drawers.
Bar Pulls
Measure bar pulls in two ways: the center-to-center distance between screw holes and the full tip-to-tip length. Standard center-to-center sizes such as 76 mm, 96 mm, and 128 mm mean you can switch or add pulls down the road.
Match pull length to drawer width. A loose rule of thumb is to select a pull approximately one-third the width of the drawer, so a 450 mm drawer goes nicely with a 150 mm pull. On really wide drawers or taller pantry doors, longer pulls provide superior leverage and a cleaner line.
Verify projection and bar thickness so your fingers clear the door face, which depends on massive or deep drawers. Slim stainless steel complements contemporary, flat-front cabinets, while warmer brass pairs beautifully when you crave a softer, luxe vibe.
Cup Pulls
Overall width of the cup
Height of the cup
Projection from the drawer front
Cup pulls rest on drawer fronts, so you note width and height to ensure they don’t overwhelm the drawer frame or adjacent fronts. When choosing the right size for cabinet hardware, ensure the projection provides room for larger hands to hook beneath the lip, particularly on heavily used kitchen drawers you open dozens of times a day. Cup pulls are an excellent choice that complement Shaker and other classic doors perfectly, allowing you to mix and match them on base drawers and pair with uncomplicated knobs on upper doors to create a consistent traditional appearance.
Knobs
Knobs are tiny and more understated than pulls, so you pay attention to diameter and projection initially. A 32 mm diameter, which is approximately 1‑1/4 inches, is a safe, popular size that just feels right on most doors and small drawers.
You verify screw length against your door or drawer thickness, so the screw bites deep but doesn’t poke through. On small drawers or upper cabinets, skip bulky knobs that appear heavy or jut too far out from the front.
Select from round knobs, egg knobs, or sculpted “lift” shapes when you desire some added detail on a smooth front. Regardless of what style you select, maintain the scale in proportion with your cabinets so the space remains serene and not cluttered.
Edge Pulls
Edge pulls wrap over the top or side of the panel, so you measure length along the edge to determine how much of the drawer or door they cover. I’ve seen many run them nearly the entire width on wide slab drawers to maintain a clean line.
You need the cabinet panel thickness, as the pull needs to fit snug over the edge without either bending or leaving a gap. Projection should remain low so the front continues to read flat, making it perfect for minimalist or handle-less-inspired kitchens.
Note precise location on each front for every pull matches up, particularly across banks of slab drawers. On a new layout, edge pulls can stand in for both knobs and bar pulls, providing you with one recurring detail throughout your cabinetry.
Doors Versus Drawers
Doors versus drawer fronts require a slightly different set of measurement guidelines, particularly in choosing the right size cabinet hardware. You want them all to look like one unified system yet still function great for each cabinet type and for each individual who shares the space.
Door Placement
For doors, you measure handle height from the edge you open first, not the hinge. On upper doors, measure down from the bottom because you don’t want to go too high. On base doors, measure up from the top edge so you don’t have to bend too far. Target a place that feels natural for your hand, typically 50 to 75 mm from the edge. This is an excellent choice for ensuring comfort and accessibility in modern cabinetry.
On shaker doors, align the handle with the rail or stile so it “rests” on the frame, not suspended in the middle of the panel. If you install a cabinet pull, locate it on the vertical stile where the frame is strongest. For pulls, align the pull’s line with the inner edge of the rail so it feels grounded, enhancing the overall aesthetic of your cabinetry.
Mark hole centers identical on each door to maintain a consistent appearance. Use a cookie cutter template or make one out of cardboard to keep the distance from the edge and from the corner the same. This is even more important in long runs of tall pantry doors, where small warps in height become very apparent. Accurate hole placement is crucial for a polished look.
Consider swing and hinges. Put knobs or pulls on the side away from the hinges with enough space that your fingers don’t bang into the wall or adjacent cabinet. On tall pantry doors, a longer pull measuring 160 to 224 mm assists you in opening from mid-height, and knobs alone can feel clumsy on hefty doors.
Drawer Placement
For drawers, the first step is to center the handle, left to right, on the drawer front. For shallow top drawers, it’s also important to center it vertically to maintain a clean line. When choosing cabinet hardware, use a pull about one-third the drawer width; for example, a 600 mm drawer works well with a 180 to 200 mm pull, while a 400 mm drawer may suit a 128 to 160 mm pull.
Deep or oversize drawers that store pots or pantry goods might require a pull slightly longer than the one-third rule for a solid grasp. On very wide drawers, approximately 600 mm and up, consider using two cabinet pulls or two knobs spaced evenly. This distributes the load and prevents stress on the front.
Cabinet pulls tend to be simpler than knobs, especially if you have feeble or arthritic hands, making them an excellent choice for heavy drawers. Many kitchens mix cabinet knobs on doors with pulls on drawers, or knobs on uppers and pulls on base cabinets to keep it uncomplicated yet visually interesting.
Mark and drill pilot holes away from edges and panel joints to avoid cracking the front. Aim for uniform spacing between stacked drawers so lines of hardware go straight across, ensuring a stunning cabinetry appearance.
Beyond the Basics
After you know the basic center-to-center figures, the first step is to pair cabinet hardware to tricky cabinets, your daily routine, and the style you’re going for. Little moves in size, spacing, and placement alter both comfort and chic.
Verify center-to-center sizes, typically 76 mm, 128 mm, and 152 mm, to the actual holes, not the catalog.
For wide drawers that measure over 600 mm, make an early decision between one long pull or two shorter pulls to prevent unnecessary holes down the road!
Dry-fit with painter’s tape: mark possible locations, open and close doors, and check knuckle clearance.
Heavy drawers, choose deeper projection so your fingers do not scrape the front.
Record which hand you’re left or right handed. Little height adjustments can contribute to reach and comfort.
Vintage Hardware
You deal with two goals at once on old cabinets: make them work well and keep their character. Begin by measuring each piece of the current cabinet hardware you have before you purchase anything. Measure the overall length, the center-to-center spacing, the backplate, if any, and the screw length. Make note of it all, as many antique brass and mid-century cabinet pulls use sizes that do not match up to today’s 76 mm, 128 mm, or 152 mm standards.
Older doors tend to have strange spacing or a combination of knobs and pulls. When you can’t line up the spacing, you fill old screw holes with wood filler or two-part epoxy, sand flat, and then re-drill new, clean holes. This first step maintains the door’s structural integrity and prevents the new screws from migrating into the weak, frayed region.
If you want to keep the old look, measure the profile too: check how far the cabinet pull stands off the door and how sharp the edges are. That guides you to discover new cabinet pulls that seem close to the original, even if the center-to-center shifts. Photograph your hardware with a ruler in the frame and keep all notes. This documentation is handy if you install cabinetry later and want to match the style.
Irregular Surfaces
Irregular fronts — such as curved, beveled, or deeply framed doors — require a more meticulous effort during the installation of cabinet hardware. A stiff steel ruler won’t help find the actual line on a curve, so instead, you should employ a supple tape measure or miniature caliper to trace the shape from side to side. While you still target the visual center, measuring from identical reference points on either side, such as the inner lip of a frame, is essential to avoid inaccuracies caused by tapering.
When dealing with doors that have a strong grain, deep grooves, or raised moldings, marking handle spots with a sharp pencil is advisable. Step back a few meters to see if the placements look right from various angles. If the mark sits in a groove, it’s wise to shift it to a flat patch to ensure the cabinet pulls lie flush. For very narrow rails, opting for a smaller pull or even a knob is recommended, allowing the screws to land in solid wood rather than a thin lip.
Before drilling, taping a piece of low-tack tape over the area can help prevent splintering. Then use a center punch or an awl to keep the bit from wandering on a bevel or texture. Many prefer wide drawers over 600 mm with either two smaller pulls or one long pull. Both options are valid; your choice depends on the shape of the front panel and the most structurally flat areas.
Ergonomic Fit
Ergonomics is about who uses the kitchen and how often, not just style lines. You want cabinet hardware that seems effortless for small hands, big hands, and arthritic hands, so you measure both length and projection. For upper cabinets, cabinet pulls between 128 to 178 mm (approximately 5 to 7 inches) are a safe size that most people can easily grab without strain. Slightly longer ones provide a sleek, modern vibe on tall doors. Knobs remain smaller and more discreet, which pairs nicely on uppers when you want less visual heft.
On drawers, a simple rule helps: choose a pull around one-third of the drawer width. On a 230–300 mm drawer (roughly 9–12 inches), a 76–102 mm cabinet pull appears proportionate and is convenient to operate. On a 600–760 mm drawer (24–30 inches), a 203–254 mm pull (8–10 inches) fits better. Extra-wide drawers over 600 mm tend to work best with two pulls for even force. One long pull can provide a crisp, modern look if you love a strong line.
You consider layout. A lot of designers mix the 4 main hardware categories by placing knobs on doors and pulls on drawers or knobs on all upper cabinets and pulls on lower. When you test grip, fling open oversized drawers stuffed with pots and pans and make sure your fingers clear the drawer front and adjacent handles. Rounded edges or soft sculpted shapes are safer around kids and flurries of food-prep activity, and standard center-to-center sizes (76 mm, 128 mm, 152 mm) make switching out cabinet hardware later a cinch, as no new holes are needed.
Avoiding Common Pitfalls
You dodge the majority of handling issues when you decelerate a little and verify minor particulars. Measuring is easy work, but little holes multiply quickly. Verify all cabinet hardware measurements prior to drilling or purchasing new hardware! A tenth of an inch off on one door doesn’t really matter, but the same error down a row of doors is noticeable. Just make sure to check the full handle length and importantly, the center-to-center distance, and compare it with the product specs. Common sizes such as 96 mm or 128 mm tend to appear ‘standard,’ but certain lines implement 3 mm or 6 mm shifts that disrupt your jig. Measure twice in the cabinet, then again with the handle before drilling your first hole!
With the proper equipment and quality cabinet hardware, you can slow down the process. A good tape measure and a small level aren’t ‘nice to have’; they keep your lines straight from wall to wall. Mark your hole spots with a sharp pencil very lightly and step back to see them as a group. For cabinet doors, put a mark approximately 50 mm (2 in) from the top edge and on the side away from the hinge unless your design specifies otherwise. For drawers, a cabinet pull about one-third of the drawer width looks balanced and is easy to grab.
See where hinges, soft-close hardware, or drawer slides lay inside the box. A handle that aligns on paper could bang into the neighboring cabinet, the wall, or a thick molding. Open all doors and drawers and dry fit one handle with tape to check clearances before you drill. This step is crucial to avoid any mishaps during installation.
Be careful to match hardware style, size, and finish. Mixing knobs and pulls can look clean when you plan it. For example, use knobs on all upper doors and pulls on lower doors and all drawers. Knobs are typically a little easier to grab onto for weak or arthritic hands. Check screw length as well. Lots of them use 25 mm (1 inch) screws, but thick drawer fronts may require longer screws while thin doors need shorter screws so tips don’t poke through.
In conclusion, choosing the right size and style of cabinet hardware is essential for both functionality and aesthetics. By following these guidelines and measuring carefully, you can ensure a stunning cabinetry finish that enhances your space.
Conclusion
To summarize, you just learned how to read a tape, identify screw hole centers and translate that to new pulls. You understand how back plates, bar pulls and knobs work on doors and drawers. You witnessed how tiny shifts in length can alter the entire appearance of a cabinet row.
You don’t need elaborate equipment. You just need a clean sheet, some marginal scribbles, and an easy-going rhythm. One cautious sweep with a tape measure can save you a world of patch work and remorse.
You’ve got the steps, you’ve got the tips, you’ve got the red flags. Play with them – use them on one door or a whole kitchen – then take a quick glance, consult your notes, and choose the handles that ‘feel’ right for you.
Frequently Asked Questions
How do you measure cabinet handle size correctly?
To begin your cabinet hardware installation, measure from center to center of the two screws, known as the center-to-center (C–C) distance. Using a metric ruler ensures accuracy. Document this measurement as it is the first step before shopping for new cabinet pulls.
What if my current cabinet handles are already installed?
One benefit of cabinet hardware, specifically handles, is that you can leave them in place and measure between the screw centers from the front. By taking off one handle and measuring from the rear, you ensure the right size for cabinet pulls or drawer pulls, allowing you to replace handles without drilling new holes.
How do you measure cabinet handles for both doors and drawers?
Use the same C–C measurement for both cabinet pulls and drawer pulls. For doors, handles tend to be shorter, while for wide drawers, you could opt for longer pulls or two pulls as an excellent choice. Always double-check hole placement before purchasing.
What is the difference between total length and center-to-center?
Total length is the entire end-to-end length of the handle, while center-to-center refers to the distance between screw holes. Choosing the right size cabinet hardware is crucial, as C–C must correspond to your current holes, affecting the style and proportion of your cabinetry.
How do you choose the right handle size for large cabinets?
Measure the door or drawer width. Most professionals use a pull that is approximately a third of that width. For really wide drawers, choose longer pulls or double pulls. It keeps the look balanced and makes opening easier.
How can you avoid mistakes when measuring cabinet handles?
Use a stiff metric ruler or tape to measure the cabinet hardware accurately. The first step is to measure twice to verify that the C to C spacing is correct for your cabinet pulls. Record both the C to C and total length, making sure to check if your cabinetry measurements are in millimeters or inches and convert if necessary.
Do handle styles affect how you should measure them?
Yes. Bar pulls, cup pulls, and arch handles all rely on the C–C rule, but their forms vary. A few styles hide their screws. In each, concentrate on the screw hole placement first, as this is the first step in choosing cabinet hardware. Then pick the style you like.
